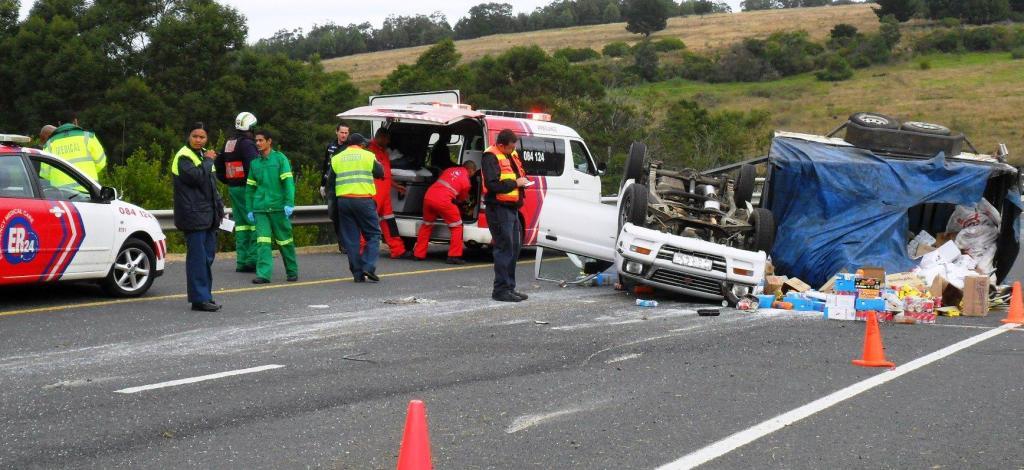
Photos do not only capture beauty – they also capture facts and are often the best evidence to be used in investigations as to why and how something happened. These photos do not need to be captured by professional photographers only…. The cellular phones are now all equipped with cameras and can assist those who have been in road accidents to capture images that will be important for insurers and any legal battles after the accident.
The Arrive Alive website approached well – known forensic accident reconstructionist, Stan Bezuidenhout and asked him to provide information on the topic “The perfect 36 Photographs of any accident”. We would like to share his advice:
 ec") The perfect 36 Photographs of any accident
The perfect 36 Photographs of any accident
Often, people ask me what they should photograph, if ever they came across an accident scene. My first reflex reaction would normally be “as much as possible,” but I quickly realized that people often have no idea of what would constitute the “right” photographs. To this end, I introduce the following piece, explaining what photographs a person could or should take, if they only had 36 exposures (typical point-and-shoot film capacity).
Before you start, you need to understand the difference between photographing the accident and photographing evidence. Untrained people, bystanders, newspaper photographers and even some trained people often attempt to use their photographs illustrate how horrible or how bad an accident is or was. They focus on things like damage, blood and bodies, in order to present the event as graphically as possible. Sadly, this is often of no use forensically.
When we photograph accidents, we are interested in evidence and relevance – not blood and guts. The goal of an accident investigation should normally be to “bring the scene to court.” Investigators need to remember that when a case is under scrutiny in court, the people there were not at the scene and are not qualified to identify elements of relevant evidence. The whole case might remember on nothing more than as few as only one key photograph.
When it comes to accident investigation and photography we prefer to have photographs we do not need rather then needing photographs we do not have. So, let’s go over those 36 critical photographs, what they should be of and what they are for:
Up to 4 Images: Set the stage

Before you worry about the actual cars and objects involved in the accident, you need to “set the stage.” Take photographs from at least four positions that will allow you to include all cars, marks, positions and relationships. If a car is close to a lamp pole, be sure to include the pole so that the vehicles can be re-married with the scene. When there are two vehicles, make sure to include both and the relationships between them. This makes it easier to show how they ended up in relation to the original accident event.
Up to 4 Images: Cover the angles

Assuming there is an intersection involved (there might not be) take photographs to show where all the vehicles were coming from, and what the relevant drivers would or could have seen. Remember, there might be stop streets, yield signs and/or traffic involved. You want to show what was visible as the vehicles approached the intersection. The visibility and placement of regulatory signs and systems can form vital evidence in court.
Up to 15 Images: Damage
 When you photograph damage to vehicles, there are a couple of preferred items of relevance. Start by photographing each vehicle from the four corners in such a way that the whole vehicle is visible in the shot. This way, you are including two sides of the vehicle in a single photograph. The exact “seriousness” of damage is not nearly as vital as the position of the damage and the angle at which the damage was caused. Depending on how many vehicles you need to photograph and how many exposures you have available, you can also photographs all four sides of all vehicles squarely, showing the whole side in each photograph.
Remember that you are trying to record the evidence and not the damage. The damage is only part of the evidence. Do not fall into the trap of only photographing the sides or angles where there is damage present. Also include the areas or sides where there is no damage. This could become vital evidence later. Also try to ensure that the photographs clearly show number plates on vehicles.
Up to 4 Images: Marks and Debris

If there are skid marks, yaw (side-skid) marks, scuff marks, gouge marks (damaged tarmac) or even just pieces of a vehicle lying around, photograph them. Skidmarks are or could be very important. Photograph them in a way that shows the side from which they started, in the direction the vehicle skidded. This established the driver contribution to prevention. Be sure to photograph this in such a way that the vehicle is visible in the shot as well, so that the casual observer can see that the marks “lead up to” the vehicle in question. Remember – evidence not sensation.
Up to 4 Images: Positions of bodies

Now, this might be a sensitive issue, but as long as bodies are covered and you do not photograph faces or enter into crime scenes without permission, the ideal would be to photograph the final resting positions of any victims or bodies that were struck or that fell out of vehicles. Remember to photograph in a way that will show the relative positions and orientation in relation to the scene as a whole. Be sure to get a vehicle, road ornament (poles, lights, etc) in on the same photographs to show where the body or victim was lying, or found. Even after a victim is removed, there might be tell-tale signs like pools of blood, medical consumables (bandages, patches, swabs and even needles) to show where the victim received primary care.
Up to 4 Images: Safety Systems

Now you can get some confirmed final details recorded. Photograph the front interiors of all vehicles. You should be able to show that airbags were fitted or not, that they deployed or not and whether they are full of blood or not. These little pieces of evidence can become vital later. Some vehicles are specifically designed not to let airbags deploy unless the occupants are wearing seat-belts. Photograph in such a way that you can also show seat-belts, where it is obvious that they were worn. Tell-tale signs would be if seat-belts are stuck in the shackled position, and cut by paramedics, where they are snagged in the extended position between the seats and sides of vehicles, or where the seatbelt is trapped, but fully retracted. This might mean it was never worn at all!
Remainder, Other stuff if you have the capacity
If you have any exposures left, or if you have a digital camera, you can also photograph license disks. Do this from close enough to clearly and legibly show all text on them, including vehicle details, expiry dates, etc. You can also photograph flat, damaged, smooth, cut or broken tyres and wheels. Don’t forget that it is also possible to photograph wind-shields (for head impacts), seat positions (where drivers ran away), damage to road ornaments (poles, barriers, walls,) etc
The above is a rough guide. If followed to the letter, you should leave the scene with at least 36 photographs that could or might come in very handy in a court of law later. It might even save innocent people from a jail sentence or prevent an accused party from walking free. Always be sensitive to the needs of victims and to the rights of individuals. As much as you are trying to help, some people might not want to be photographed while they are indecently exposed and in critical condition. Try to set up your shots in such a way that it would not place a victim in a precarious, compromised or exposed position in your shots. Imagine the implications if a widow received photographs of her dead husband lying in a pool of blood, via e-mail after you distributed the images without due consideration to their privacy. Imagine if she received it before knowing that her husband was killed in an accident!
If you do decide to take photographs of an accident scene, do not make your photographs public or distribute it to your friends. You could be sued for this, if it places a particular party or person in a bad light, or if minors are exposed without consent. Remember that you should technically not be photographing accident scenes unless you are trying to help, or are willing to testify to having taken them, even if this is purely out of respect for the victims.
The above is only a rough guide, and does not represent any specific legal or official at-scene investigative protocol, technique, process or procedure and is provided for information purposes only.
Stan Bezuidenhout
Forensic Accident Reconstructionist / Managing Director/
IBF Investigations cc, South Africa
Website: www.ibfsa.com
Also view the Arrive Alive Road Safety Website


Baie danie ek het baie geleer en sal my bes doen om nie in ‘n motorongeluk betrokke te wees nie. Baie sterkte vir alle “CSI”