PAN PAN PAN PAN PAN !!!!!!….
These are often the words you will hear while on safari with me .
Today I’d like to take a brief look at the topic of panning– that of photographing moving subjects.
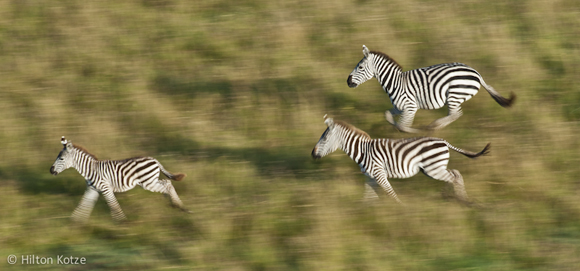
The basic idea behind panning as a technique is that you pan your camera along in time with the moving subject and end up getting a relatively sharp subject but a blurred background.

Photo: Hilton Kotze
Canon MK II N , Manual Mode, ISO 400, 1/45s, f6.7, 100-400mm lens
Panning is a technique that can produce amazing results (if you perfect it…. or get lucky) but is also one that can take a lot of practice to get right. It gives the shot a feeling of movement and speed. It’s particularly useful in capturing any fast moving subject whether it be a racing car, moving animal, cyclist etc.
Panning in wildlife has its own challenges, There are no rules with panning and you have to adapt to each situation on the spot. Animals move at various speeds depending on the situations at that time ( walking running hunting displaying)
You have to be able to asses the situation very quickly and make the decision to pan or shoot normally, being able to adjust your camera setting quickly critical to getting the shot right. I’ve found that panning seems to work best with moving subjects that are perpendicular to me.

Photo: Hilton Kotze
Nikon D3S, Aperture Priority, ISO 250, 1/30, f22, 70-200mm lens
How does it work
- Select a slightly slower shutter speed than you normally would. Start with 1/40s and then play around with slower ones. Depending on the speed of your subject light you could end up using anything between 1/100s and 1/10s – although at the slower end you’ll probably end up with camera shake on top of your motion blur.
- Position yourself in a place where your view of the subject will not be obstructed by anyone or anything else. Although you don’t have much say in the background in wildlife odd shapes and colors can be distracting. Single colored or plain backgrounds tend to work best.
- As the subject approaches track it smoothly with your camera. If I am shooting with a long lens I find that using a panning plate (get it at outdoor photos shop) is perfect for the action required , just place the panning plate on a solid bean bag and you are in business.
- I would typically set my camera on the following settings as a starting point for Panning… Depending on the speed of the animal I would then adjust shutter speed faster or slower to get the correct effect.
- Shutter priority /TV at 1/40s
- ISO as low as possible (to allow for slow shutter speed )
- Matrix metering mode/evaluative
- Auto focus on lens
- Continuous shooting /AI servo
- Start tracking the subject as it is approaching and push the shutter button when it is at about a 45 degree angle to you , track and shoot till subject is perpendicular or just past you

Once you’ve released the shutter it is a good idea to continue to pan with the subject, even after you’ve heard the shot is complete. This smooth follow through will ensure the motion blur is smooth from start to finish in your shot.
Remember Panning takes lots of practice you may shoot 100 shots and only a handful are correct , that’s ok , just keep shooting and it will get easier as time goes on

Photo: Hilton Kotze
Nikon D3x, ISO 200, 1/30s, f22, 70-200mmlens


I notice that the shots are shot at f22. Why such a small apperture?
Hi Jaap
A lot of times in wildlife photography you cant predict whats going to happen and when something does happen it happens fast, and you have to get into other setting as quickly as possible.
I typically shoot a normal wildlife scene in Aperture priority mode at lowest f stop my lens allows me , if the animal for some reason starts running the quickest way for me to slow the shutter down without swapping modes and chaining shutter speed for panning is to push the f stop up.
hope this helps
Thanx for the explanation Hilton.