Ever wonder how in some photos everything looks exactly like a scale miniature?
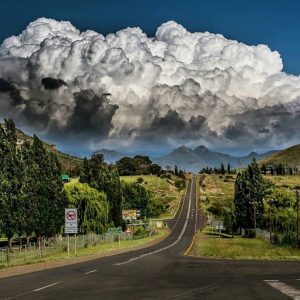
Wonder no more. Today we will show you how to make the miniature effect using your DSLR camera. I personally use the Nikon D5100. The camera has an miniature effect under it’s effects menu. But what is the miniature effect really? While setting up the scene through your view finder or live view, the camera’s miniature settings ads a layer of blur at the top and bottom of the scene. (Depending on your settings, the blur can be applied horizontally or vertically and the amount of space each takes up.) Example:

Camera Blur Effect
Make sure the part you really want to make look miniature, is centred in the middle of your scene. Otherwise the blur the camera will apply, will be over your point of interest, like in the example above.
Ok, now that you have your camera on the correct settings, and your point of interest aligned in the middle of your scene, you can go ahead and take the picture. Remember, you have to view the image at an large resolution so that you can get the full effect. Usually if you just view it on the camera, it almost looks like nothing happened, so take a couple of images and play around with your settings. This is really quite a lot of when once you start to get the hang off it.
Short Tips:
Use a tripod
Align your scene in the middle
Take a couple of test shots with the miniature effect and it’s different settings.
The larger the area you focus on, the better and the more detailed your photo will look.
A nice start will be like a city, harbour or street scene.
After you have taken your photo and you see that the blurring effect and the miniature effect is not quite as dramatic as you would like, you can always use software like photoshop to enhance your effects.
Here is quick way to do just that.
Step1
Import your miniature photo into photoshop
Step2
Select the Blur Tool (it is on the left side with the icon that looks like a water drop)

Using Blur Tool
Start off by setting the blur tools settings to about 30%. If it is too strong the effect will become overwhelming. You can always add more blur by starting off soft.
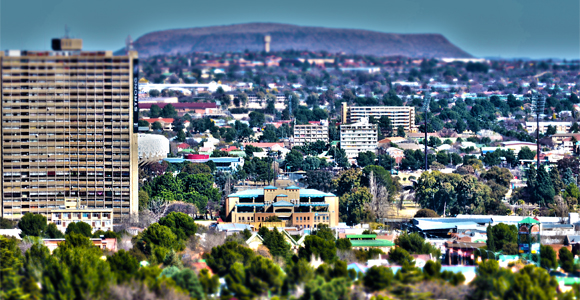
Now see where you apply blur, and slowly apply some blur in those areas. Be careful not to touch the areas you want to stand out. I want these particular buildings to stand out, so i blur around them.
Step3
Once you are satisfied with your blur you are going to use your sharpening tool. (Just under the blur tool)

Sharpening Tool
Use the same setting as we did with the blur tool but now, we are going to sharpen the edges of the scene that you picked to be the miniature. In my photo i picked the buildings, so now you take the sharpening tool and sharpen all the visible edges. Be careful of sharpening it too much, it will reduce the quality of your image. The more you go into detail the better it will look.
Here is example of where to use your sharpening and blur tool

Editing Areas
And that is it! You have enhanced your miniature effect on your photo. This technique also works with any photo. So don’t worry if your camera does not have the miniature function, just follow these steps above and transform your picture into a miniature scene. Just remember to blur all around the edges of the photo. Here is my final image below.

Miniature Effect by Pierre Steenkamp
Happy Editing!