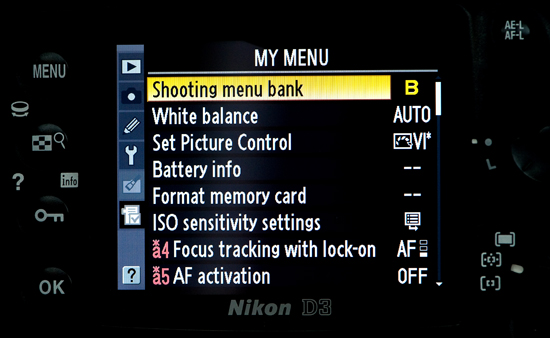
On the Nikon system you got a option to setup your own menu. It is very easy. Just go to my Menu and then to add. Scroll through all the different menus and add those settings that you most regularly using to your “My Menu” This helps one a lot when you quickly want to adjust settings on you camera and don’t want to scroll through 500 menus settings to find the right one. Specially when you’re under pressure one tends to miss it the whole time and looking like a complete idiot not able to set up your own camera.
This setting specially comes in handy when one changes from one type of photography to another like from sport photography to weddings. You can then with the flick of a few dials change your camera’s settings completely in a matter of seconds and be ready for the next shoot.
I personally always rank my most important settings from top to bottom just to make it more easy. In this post I’m just going to go through the top eight settings to give you an idea what I’m doing.
1. Shooting Menu Bank – In this section I set up the different types of photography that I’m mostly practicing. By just changing this setting you can already change most of the important settings to get you going like, White Balance, Picture Quality(Raw or Jpeg), Picture Control(Standard or Vivid) and Auto ISO settings.

2. White Balance – Here I fine tune the White Balance according to the specific shoot like for instance Rugby in daylight I will use the Auto White Balance setting, rugby under Flood lights I will shoot it on the Kelvin setting and when shooting Gymnastics I will setup a custom white balance according to the light temperature.

3. Set Picture Control – Basically I got two settings that I’m using. Standard and Vivid. The Vivid setting I have customize it by dropping the saturation and contrast by 1. For portraits, weddings etc I will always use the standard setting and never vivid. For sport, wildlife, landscapes and pictorial I mostly use the vivid setting.

4. Battery Info: This is just to check you battery level the whole time and it also got a function where you can check the amount of cycles since you started using the battery. By putting in a freshly charged battery in the morning I can check throughout the day or shoot how many images I have taken even if I have taken out some of the memory cards out for downloading.
5. Format Memory Card- So you can quickly format your memory cards every time you slot them into your camera.
6. ISO Settings – This comes in very handy. You can read the post that I have posted a few days ago regarding this.

7. Focus tracking with lock on – What this does is that when shooting sport and something or someone comes between you and the subject you’re shooting there will be a delay before the auto focus jump to the subject interfering. This delay can be set from long to off. I’m using all of them depending what sport I’m shooting.

8. AF Activation – Here one can determine if your shutter knob in front will activate the focus as well or just releasing the shutter. Once again I’m using both. For wildlife photography it will be on off so that I can activate the AF with the button at the back of the camera and the shutter release button will only release the shutter. With sport I’m setting it on so the the shutter button will activate the AF and release the shutter,. The reason for this is that I am left handed so my right hand is a bit slower than my left and for thus I’m struggling with the coordination between my thumb activation the AF and my index finger releasing the shutter. Most right handed sports photographers are using the setting on off so the two works independently.


This is just a guide line and one must play around till you get the perfect setup for your “My Menu” that will work for your needs.