If you have, like me, ever wondered about these questions, then I suggest you read Shem Compion‘s book. This is a brilliant book with lots of information for the beginner as well as professional Photographer. Insider’s Guide: Top Photography spots in South Africa. I quote from this book:
“Digital cameras have made photography so much more accessible, resulting in many more people photographing. And, of course, South African culture revolves in part about relaxation in nature.
It takes a certain understanding of your camera and added elements of light and composition before you get good results. And,most important, lots of practice!
South African Nature and available light
South Africa has two distinct seasons and, except for the Cape Provinces, the rest of the country has a warm-hot rainy season that runs from October to April and a cool dry season from May to September. These seasons significantly affect animal viewing….
It is important to understand the differences in the quality of light during the different seasons. From May to September dust accumulates in the atmosphere on a daily basis. As the season wears on , this dust filters out sunlight, which in turn creates a golden glow at sunrise and sunset. Combined with the lower angle of the sun during this months, we find soft golden hues that are perfect for photography.
From October to April the rains wash out the dust, leaving a strong brilliant light from the sun. Even at sunsets the strength of the sun is very strong.
A wildlife photographer needs to understand the weather patterns. Have knowledge of impending cloud formations or cold fronts.

Hippo Photo: Denese Lups
Even if you have the best camera in the world and are acquainted with all the detail in the manual, you will still need to know how light and composition combine to make great photographs.
Understanding light when taking photos
As the sun rises each day, it follows a path from the horizon to overhead and then down onto the horizon again. This rising and setting affects the quality and colour of the light that reaches us. At dawn and dusk, the oblique angle of light produces very warm colours of red and gold. These hues result in the blue and green colours being filtered out by the band of atmospheric dust that lies just above the earth’s surface. Red and yellow rays are thus predominant during early mornings and late afternoons providing a lovely golden glow. These hours are termed the golden hours when contrast is low and shadows soft.
The difference between these photos? Light!!

African Wattled Lapwing Photo: Denese Lups

African Wattled Lapwing Photo: Denese Lups
During midday when the sun shines directly onto the earth’s surface, there is little atmospheric dust to filter out the sun’s rays. The colour of the light is more natural, but also harsher and with greater contrast.
There are always exceptions to the rule. Overcast days produce good, soft light in the middle of the day which allows opportunities for good photography. This we call diffused light. The clouds act as a filter and diffuse the light so that it falls very evenly, reducing shadows and saturating colours.
The quality and colour of light are the primary indicators of how you set up your photography. They set the stage for you, your camera and the images you want to create.
Look at the two photos below. The first was taken at midday and the second on an overcast day.

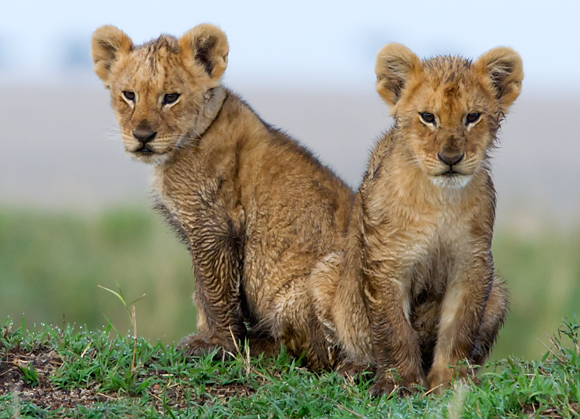
Cheetah with cubs Photo: Denese Lups

Cheetah with cubs Photo: Denese Lups
Types of light
Front lighting is described when you see a subject shining from over your shoulder (you are between the sun and the subject). Front lighting shows very little shadow. This type of lighting provides very little depth, so the images are accurately representative but very two-dimensional.
Side lighting is when the sun is shining at right angles to the subject. It shows great detail and texture in the subject as well as bringing out a third dimension to the image.
Back lighting is when the light is shining from behind the subject. Almost always a silhouette, this is effective for subjects with a recognisable shape. Subjects with fur or hair often have a ring or halo of light around them, creating stunning effects. This lighting technique is probably the most difficult to master, but can be the most rewarding.
Understanding composition
Composition is a matter of individual opinion and choice, however there are a number of guidelines that give balance and impact to an image.

Black-winged stilt Photo: Denese Lups
Rule of Thirds Used by artists, the “Rule of Thirds” are imaginary lines dividing the image into thirds both horizontally and vertically. The important elements of your composition are placed where these lines intersect. It is a rule that forms the basis for many images and can be used in landscapes as well as for portraits. However, if you can create a better image by bending or ignoring rules, photograph it anyway.
Leading lines Great images tell a story, and a leading line is a way of taking the viewer into the image.
Subject placement When taking portraits of animals, it is useful to frame the subject to the one side of the frame so that they look out of the image into the empty space.
Landscape and portrait mode Photographers often forget that you can turn the camera sideways and try a different format.
Changing angle By changing the angle and the position from which you look at a subject, can create a completely different image.
All these elements combined, you still need to add emotion, mood and atmosphere to an image.”
Read also the previous post by Gerhard Steenkamp. Follow link https://www.phototalk.co.za/2011/10/seeing-the-light-from-satara-to-lower-sabie/
Above information credited to Shem Compion and his book on Wildlife Photography, Insider’s Guide – Top Wildlife Photography Spots in South Africa.